Hi guys!
Every once in a while, if you’re anything like me, you love to indulge in some nasty, greasy yet tasty fast food, whether you’re a “health freak” or just a regular person who eats everything in moderation (I’m the latter, even though I know I eat too much chocolate to be honest).
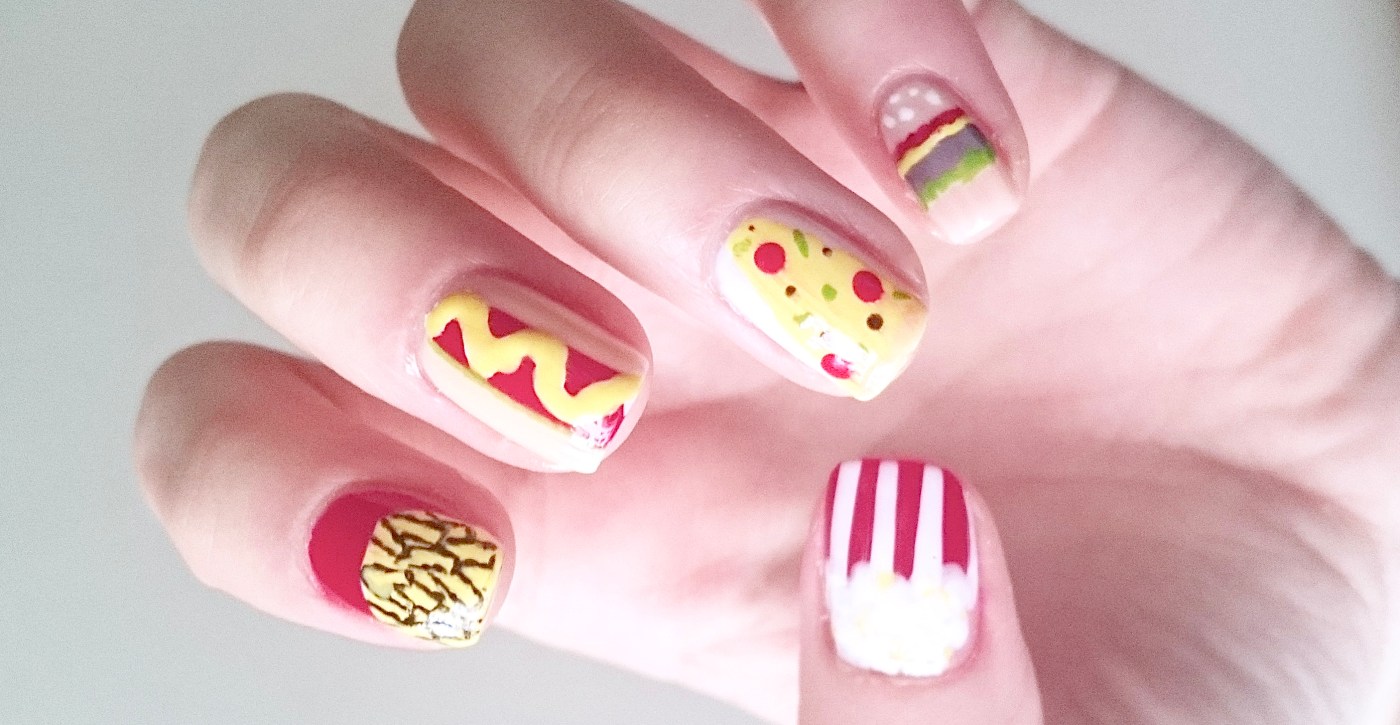
This nail tutorial was posted by Shay Mitchell on her YouTube channel a few days ago, and as soon as I saw it I knew I had to give it a go. Especially when she made it all seem so easily achievable (it’s not THAT easy though, but definitely not hard, and worth trying). I changed the design on the thumb because I wasn’t that much into the ice-cream she did, so I opted for the best snack on this planet: popcorn.
If you’re into nail art, have too much time on your hand or simply would like to add a pop of colour and fun patterns into your life, then this is definitely something you should try. The steps are simple and because it’s food, it doest have to be so precise and neat. However, have patience and a steady hand, you’ll be rotating between the nails to give each layer time to dry and prevent the different colours from ‘bleeding’ onto each other.
The things you’ll need:

I only do my nails once a month or so, so I never really bother to buy expensive nail varnishes, unless I’m absolutely in love with a certain colour I can’t find a cheaper version of. I forgot to buy a black striping brush but it’s extremely handy, so don’t repeat my mistake 😉
- Start with clean, filed my nails. Use two coats of nail varnish (red and white) on each nail. Because my (cheap) nude doesn’t show easily, I had to start with a white base. If yours is of a better quality, feel free to skip the white base on two nails (one actually needs a white base).

- Add two coats of nude nail varnish on two nails (it’s still a bit light but I can’t add more coats otherwise it’ll be too thick).

- Add a red stripe across one of the nude nails, which will be the base for the hot dog.

- While your middle finger is drying out, you move on to your thumb and start painting white stripes using the white striping brush, which will eventually be the popcorn bucket.

- You then use the bobby pin (a dotting tool or brush can also be used) to make small random dots in the form of popcorn. It doesn’t have to be neat at all, which makes it easier and more fun.

- To add a little bit of dimension, add tiny random yellow dots here and there. It also doubles as the butter on the popcorn (Although I like mine plain with salt-OMG I’m craving it now).

- You go back to your unfinished hot dog and add a swirl of white varnish using the bobby pin again. On the tutorial I’ve seen they used the white striping brush, but mine was rubbish (Again-cheap!) so I used the pin instead.

- Paint a white semi-circle on your red nail, this will be the McDonald’s chips holder.

- Take the yellow nail varnish and paint a triangle on the white nail. It’s time to start with the pizza!

- Go back to your semi-circle and paint it yellow. This will be the base for the chips.

- Add the crust to your pizza by dotting nude nail varnish to the base of your yellow triangle. The messier the better.

- Because I don’t have brown nail varnish, I mixed a bit of black with nude to get a dark brownish colour for the meat of the hamburger.

- Let that dry and go add the yellow nail varnish on top of that white swirl for the mustard on the hot dog.

- To add pepperoni on the pizza, use red nail varnish and a bobby pin, dotting tool or the back end of a brush.

- Add black super tiny dots for the olives.

- Add green tiny stripes for peppers.

- Now add a green stripe underneath the dark brown one for the lettuce.

- Continuing on the hamburger, add a red stripe for the tomato. As you can see, I’m not trying to make it neat at all.

- Now add a tiny white stripe between the red and dark brown. This will be the base for the cheese.

- Now back to the chips, this is where a black striping brush comes in very handy. As I didn’t have one, I used the sharp corner of a paper to paint the chips individually. I have to say, it wasn’t as hard as I thought it would be. Also, try to keep the lines long and straight as I find mine to be too short and random.

- Add the yellow stripe of cheese on the hamburger.

- Finish off with a top coat after you’re a hundred percent sure everything is dry. I also added tiny white dots on the bun of the hamburger as sesame seeds.

Et voilà! Your fast food mani is done. I know it’s tempting, but try not to grab a snack every time you look at it. Also, nothing needs to be exactly identical, feel free to add your own touch and most importantly, have fun with it.


Leave a comment